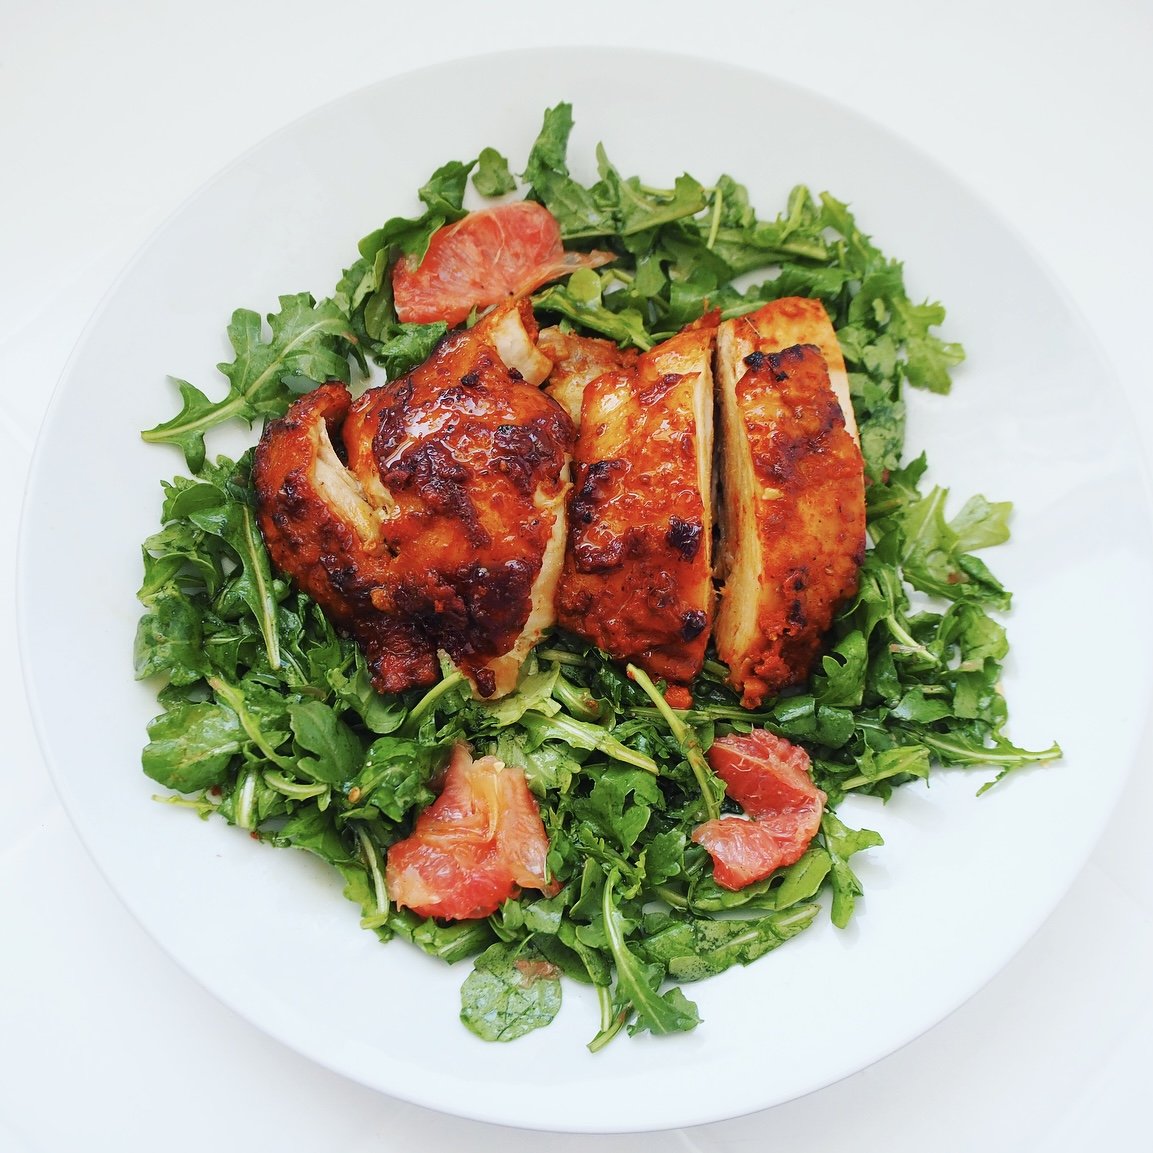
Harissa-Marinated Chicken with Red Grapefruit Salad

What better way can you treat yourself than with a healthy meal at the end of a long week?

Lately, I've found that a great way to decompress is spending more time cooking! Instead of 20-minute meals on a weeknight, I've been enjoying longer stints in the kitchen, building depths of flavor that can be hard to come by in less time.

This recipe, from Ottolenghi: The Cookbook, takes some time and effort, but I found the entire cooking process to be meditative. I loved roasting peppers over an open flame, toasting aromatic spices in a skillet, and bringing it all together with a spicy harissa marinade that the chicken soaked up in the refrigerator overnight.

After roasting the chicken the next day, it's a simple process - segment out some grapefruit and make a sweet and tart grapefruit sauce. Then add all the ingredients over a bed of arugula salad, and voila! So yum and satisfying.

Harissa-Marinated Chicken with Red Grapefruit Salad
from Ottolenghi The Cookbook

Serves: 4

Ingredients
Harissa marinade
1 red bell pepper
1⁄4 tsp coriander seeds
1⁄4 tsp cumin seeds
1⁄4 tsp caraway seeds
1⁄2 tbsp olive oil
1 small red onion, coarsely chopped
3 cloves garlic, coarsely chopped
2 mild fresh red chiles, seeded and coarsely chopped
1 dried red chile, seeded and coarsely chopped
11⁄2 tsp tomato paste
2 tbsp lemon juice
1⁄2 tsp salt
1 tbsp Greek yogurt
13⁄4 lb / 800 g organic or free-range chicken thigh meat (8 to 10 thighs)

Red grapefruit salad
2 red grapefruits
4 oz / 120 g peppery wild arugula
1 tsp olive oil
coarse sea salt and freshly ground black pepper

Sauce
2⁄3 cup / 150 ml pink grapefruit juice
generous 1⁄2 cup / 130 ml lemon juice
2⁄3 cup / 150 ml maple syrup
1⁄4 tsp salt
pinch of ground cinnamon
1 star anise

Directions
To make the marinade, over the flame on a gas stove top or under a very hot broiler, roast the red pepper until blackened on the outside. This typically takes about 8 minutes on an open flame or 15 to 20 minutes under a very hot broiler. Place the pepper in a bowl, cover with plastic wrap, and leave to cool. Peel the pepper and discard the seeds.

Place the coriander, cumin, and caraway seeds in a dry frying pan over low heat and toast lightly for 2 minutes. You should be able to smell the aromas of the spices. Transfer them to a mortar and grind to a powder with a pestle.

Heat the olive oil in a frying pan, add the onion, garlic, and fresh and dried chiles, and fry over medium heat for 6 to 8 minutes, until they turn a dark, smoky color. Now blitz together all the marinade ingredients except the yogurt in a food processor or blender; you will have a pure harissa paste.

To marinate the chicken, mix the paste with the yogurt and use your hands to rub it all over the chicken thighs. Layer them in a plastic container, seal, and refrigerate overnight.

The next day, to make the grapefruit salad, take each grapefruit and use a small, sharp knife to slice off the top and tail. Now cut down its sides, following its natural lines, to remove the skin and white pith. Over a small bowl, cut in between the membranes to remove the individual segments. Squeeze any remaining juice into a bowl and keep it to make up the 2⁄3 cup / 150 ml juice required for the sauce.

Preheat the oven to 425°F / 220°C. Lay out the marinated chicken pieces, spaced well apart, on a large baking sheet and place in the hot oven. After 5 minutes, lower the oven temperature to 350°F / 180°C and cook for another 12 to 15 minutes, until the chicken is almost cooked through. Now place the chicken under a hot broiler for 2 to 3 minutes to give it extra color and cook it through completely.

Meanwhile, place all the sauce ingredients in a small pan and bring to a light simmer. Simmer for about 20 minutes, or until reduced to one-third.

To serve, toss the arugula and grapefruit segments with the olive oil, salt, and pepper. Pile in the center of 4 serving plates, put the warm chicken on top, and drizzle about 1 tablespoon of the sauce over each portion.


Comment


Print

Australian Grassfed Steak Tacos

These are Australian grassfed beef tacos. They're made with strip steak and served over a street style corn tortilla with a cilantro mayonnaise sauce. They're garnished with radishes and nasturtiums.

I’ve got just the recipe for your next Taco Tuesday! These strip steak tacos are so juicy and absolutely perfect for your summer cooking endeavors. Served up with a tangy tomatillo salsa, cilantro mayo, and fresh radishes and greens, they’re handheld and as easy to eat as they are to put together.

One technique I like to use when I make this dish is to dry brine the steak. It sounds fancy, but it’s super simple: all you do is season the steak with salt and allow it to absorb into the protein for 1-3 days. Somehow, by the magic of nutrition science (osmosis and diffusion), this process enhances the flavor of the steak tenfold! The results are tender, mouthwatering, and allow for a perfectly seared crust!

Steak tacos are best with Australian grassfed beef because it’s lean, clean, and best of all – nutritious! Whether you’re looking to focus on lean protein for performance, or following a high-protein diet, you can find grassfed beef from Australia at your local supermarket.

Australian Grassfed Steak Tacos

Time: 30 Minutes + Dry Brining (optional)
Serves 4

Ingredients
2 Australian grassfed strip steaks, about 1 ½ lbs
Kosher salt
1/2 cup mayonnaise
1 tbsp capers, drained
2 cloves garlic
½ bunch cilantro
Extra virgin olive oil
1/2 tsp lime juice
Canola oil, for frying
12 small corn tortillas
A handful of small nasturtiums or baby arugula
4 radishes, thinly sliced
1 tsp white wine vinegar
2 medium tomatillos, finely diced
Juice of 2 limes
4 Lime wedges, for serving

Directions
Generously season the Australian grassfed steaks with 3/4 tsp salt on all sides. Cover and transfer to refrigerator to dry brine overnight.

Remove steaks from refrigerator and trim off fat. Transfer fat to a large heavy skillet or Dutch oven. Heat skillet and fat over low heat and cook until the fat renders enough to cover the bottom of the pan, about 10-15 minutes. Transfer any remaining fat pieces to a plate.

In the same skillet, heat rendered fat on high heat and add steak to the pan, working in batches if necessary to avoid overcrowding the pan and ensure that a crust forms. Sear on one side for 3 minutes, without moving the steak. Turn over and cook for another 2-3 minutes. Transfer steak to a platter and let rest for 10 minutes.

In a blender, add mayonnaise, capers, garlic, cilantro, 4 tbsp olive oil, and lime juice and blend on high until the mayonnaise reaches a smooth consistency. Fold in more mayonnaise if needed and season with salt and pepper.

Heat enough canola oil to line the bottom of a small skillet and heat over medium heat. Add one tortilla at a time, and fry on each side, flipping with tongs, about 20-30 seconds, until crisp. Transfer to a paper towel-lined plate, separating each tortilla with a paper towel to blot out excess oil. Keep warm.

In a small bowl, combine nasturtiums, radishes, and white wine vinegar. Season with salt and pepper to taste.

Once the steak has rested, dice steak into 1/2-inch cubes. Combine with reserved pieces of fat if desired (they taste soooo good!). Add to a bowl with tomatillos, lime juice, and 1 tbsp olive oil. Season to taste with salt and pepper.

Prepare tacos by spreading cilantro mayonnaise over each tortilla. Top with Australian grassfed steak and follow with nasturtiums and radishes. Season to taste with salt and pepper. Serve with lime wedges on the side.


Chili Verde Tacos with Homemade Black Cornmeal Tortillas

We made tacos last night and had time to enjoy the fruits of our labor! Okay, so maybe really the tacos of our labor because not only did we make them from scratch, which was a lot of fun, but we also grew Hopi heirloom black corn last summer and finally processed the dried kernels into cornmeal! 

While this sounds like the perfect farm-to-table/garden-to-kitchen story, there was one minor setback. We were so excited to make tacos that we made the cornmeal before remembering to prep the kernels for masa harina (that will be another post down the road for those wondering how to do that). So we ended up having to make the cornmeal tortillas with added flour, which still ended up tasting super wholesome and amazing. So below is our recipe for that! You can check out more in My Story on Instagram for the tortilla making process.

Chili Verde Tacos with Homemade Black Cornmeal Tortillas

Time: Tacos: 35 Minutes; Tortillas: 1 Hour 30 Minutes
Serves 10-12 people

Ingredients

Tortillas (Makes 30)
2 cups Hopi black cornmeal
4 cups unbleached all-purpose flour
12 tablespoons olive oil
1.5 cups water
1.5 tsp salt

Tacos
2.5 lbs boneless skinless chicken thighs
15 tomatillos
3 fresh jalapeños, roughly chopped
1 medium onion, quartered
6 cloves garlic, roughly chopped
1 tsp kosher salt
1 tbsp ground cumin
1 tsp distilled white vinegar
4 oz pickled jalapeños, diced
1/2 large bunch cilantro
1 tbsp lime juice

For Serving
Warmed black corn tortillas
Pickled watermelon radish
Diced white onion
Cilantro
Sliced pickled jalapeños
Sour cream
Lime wedges

Directions

Tortillas
In a large mixing bowl, add black cornmeal, flour, and oil. Slowly mix in water and salt with a wooden spoon. Knead dough for 1-2 minutes, until the dough is smooth like Play Dough.

Separate dough into about 30 (1.25 inch) pieces rolled into balls, placing on parchment paper when done. Let dough rest, covered, for 30 minutes. 

Line one side of the tortilla press with a plastic quart-size zip-top bag. Place one dough ball in the middle, but slightly off center toward the closing hinge. Cover dough with another plastic quart-size bag. Close the tortilla press firmly to form a thin tortilla. Carefully peel off plastic film and cook each individual tortilla immediately on a hot, un-greased griddle for about 1 minute per side. Alternatively, uncooked tortillas can be transferred to a plate lined with parchment paper, separating tortillas between additional pieces of parchment paper. Tortillas can be stacked on top of each other once they’re removed from the pan and kept warm. 

Tacos
In a medium pressure cooker, prepare chili verde sauce by combining chicken, tomatillos, fresh jalapeños, onion, garlic, salt, cumin, and vinegar. Place on high heat and stir for a couple minutes. Cover and cook over high pressure for 15 minutes. Carefully release pressure under cool water. Remove lid and return pressure cooker to stove.

Set chicken pieces aside on a plate. Add cilantro, sliced jalapeños, and lime juice to the pot. Bring to a simmer and reduce sauce until it reaches a salsa-like consistency. Return chicken to the pressure cooker for 1-2 minutes, until warmed through. 

Serve chicken pieces over black corn tortillas, topped with tomatillo sauce. Garnish with pickled radishes, white onion, cilantro, pickled jalapeños, sour cream, and lime wedges.

Wild Rice Bowl with Mushrooms, Bok Choy & Soft-Boiled Eggs

How about this delicious wild rice bowl with mushrooms, bok choy, AND soft-boiled eggs? Most of you may have heard that wild rice is healthier for you than white rice, but do you know how much healthier? 

Per 1 cup (cooked) serving, wild rice has 20% less calories (170 vs 210), 75 percent more protein (7g vs 4g), and 300% more fiber (3g vs 1g). Wild rice is also richer in vitamins and minerals, offering more riboflavin, B-6, phosphorous, zinc, and magnesium (although noticeably less folate). Consider this your white rice substitute if you’re watching your calories! 

I’ve been eyeing some wild rice at the store recently, but because Adrian thought he wasn’t a huge fan, I set out to convince him that he was by infusing some of his favorite asian ingredients, including gochjang paste, kimchi, bok choy, and pickled radishes with soft-boiled eggs and mushrooms. The mission was a success! We even tried the recipe separately with quinoa and the wild rice stole the show.

I’m always looking to use nutrient dense ingredients in my cooking, and now, wild rice is finally back in the mix. Woohoo!

Wild Rice Bowl with Mushrooms, Bok Choy & Soft-Boiled Eggs

Time: 45 Minutes
Serves 4

Ingredients
3 cups mushroom or vegetable broth
¾ cup wild rice
¼ cup water
¼ cup rice vinegar
1 tbsp honey
1 bunch radishes and greens, radishes cut into ¼ inch thick rounds halved, greens reserved
½ tsp sea salt
Freshly ground black pepper
1 tbsp ginger, minced
3 tbsp sesame oil, divided
2 tsp light soy sauce
4 large eggs
8 oz shiitake mushrooms, stemmed, sliced thin
8 cloves garlic, finely chopped
2 cherry bomb or red jalapeno peppers, thinly sliced
2 tbsp gochujang paste
2 tbsp dry sherry
3 large baby bok choy, trimmed and chopped
6 green onions, white and light green parts, thinly sliced
¾ cup kimchi 

Directions
In a medium saucepan, bring broth to a boil. Add rice and reduce heat to a simmer. Cover and simmer for 40-45 minutes, until some of the grains have burst open. Drain off any remaining liquid, fluff with a fork, and set aside.

Add water, vinegar, honey, and salt to a small saucepan. Bring to a boil, stir to combine, and remove from heat. Season with salt and pepper to taste. Place radishes in a medium bowl and pour over vinegar mixture. Set aside to cool. 

In a small bowl, add ginger, soy sauce, 1 tbsp sesame oil, and stir to combine. Set aside.

In a medium saucepan, heat 12 cups water to a low simmer, where the tiny bubbles just barely break the surface. (180F). Add eggs continue to simmer for 6 minutes. Transfer to an ice water bath with a slotted spoon and cool. Remove eggs from ice and gently remove shell, running under cold water to remove any small pieces. Cut eggs in half.

Heat 2 tbsp sesame oil in a large skillet over medium-high heat. Add mushrooms, and cook, stirring, for 4-5 minutes, until lightly browned. Stir in garlic and peppers, and cook until garlic is fragrant, about 30 seconds. Add gochujang and sherry and stir to combine. Add bok choy and reserved radish greens and stir for 3-4 minutes, until greens have wilted. Remove from heat, and stir in reserved ginger-sesame sauce.    

Divide the wild rice between 4 bowls and top with mushrooms mixture, eggs, kimchi, and pickled radishes. Garnish with green onions and serve immediately. 

Korean Beef & Daikon Radish Soup

It’s been a big week between traveling for Christmas and both Adrian and I battling various colds. That means I haven’t had time to meal plan and we were nearly left stranded for dinner last night. Good thing we had a simple soup in our recipe arsenal from my favorite Korean blogger, Maangchi, and we knew what we needed to eat right away! We love that this soup has very few ingredients and is really easy to make, so shopping last minute was as easy as pie. We added some extra green onions, some turnip greens from our garden, and of course, our favorite garden grown dried chilies. It’s also yummy to taste with a little bit of lime juice and Gochujang, in my humble opinion, and perfect served with a side of rice and kimchi. Yum! 

Korean Beef & Daikon Radish Soup

Time: 45 Minutes
Serves 4
Adapted from Maangchi’s Beef and Radish Soup

Ingredients
14 cups water
1 lb daikon, peeled, cut into 1½ x ¼-inch pieces
1 lb beef brisket, cut into 1-inch pieces
8  garlic cloves, minced
2 tablespoon fish sauce
1 tsp sea salt
1 bunch green onions, sliced thinly diagonally

To Serve
Lime juice, to taste (optional)
Gochujang, to taste, about 1 tsp per bowl (optional)
4 cups steamed rice
Kimchi

Directions
Bring water and daikon to boil in a large pot or Dutch oven over medium-high heat. Add beef, garlic, and turn the heat down to medium, and cook for 25 minutes. Stir in fish sauce, salt, and green onions and cook for 5 minutes longer. Remove from heat.

Ladle soup into bowls and add lime and Gochujang if desired. Serve with rice and kimchi on the side.

Surf & Turf Spaghetti (Spaghetti alla Mare e Terra)

How do you make your favorite pancetta or bacon pasta healthier? By adding seafood and plenty of vegetables to it, of course! 

For flavor (and to hit the spot!), this Surf and Turf Spaghetti has just a touch of pancetta, but delivers a nutritional punch with an amazing amount of garlic, plenty of fennel and cherry tomatoes, and for an omega-3 boost, shrimp and octopus. Just check out my nutritional analysis below the recipe. 

Each serving comes with a reasonable 550 calories and almost half of your vitamin A, vitamin C, calcium, and iron. Not bad, right? Pasta doesn’t have to be a guilty pleasure after all! 

Adrian decided that we’d call this one Spaghetti alla Mare e Terra because he’s cute like that. Somehow he still remembers Italian from studying abroad in Florence over a decade ago. I wish I had that memory, but at least I can rely on his when we're overseas!

Surf & Turf Spaghetti (Spaghetti alla Mare e Terra)

Time: 40 Minutes
Serves 6

Ingredients
¾ lb spaghetti
2 tbsp olive oil, divided
4 oz pancetta, diced
8 garlic cloves, minced
10-12 dried birdseye chili peppers, briefly toasted, roughly chopped
2 tsp fennel seeds, crushed
3 medium fennel bulbs, cored, cut into thin wedges
1 pint cherry tomatoes, halved
2 cups (16 oz) chicken broth
1 lb medium shrimp, peeled and deveined
4 tbsp parsley, finely chopped, divided
Juice and zest of 2 lemons
2 (4 oz) cans octopus in olive oil
1 ¼ cups Parmesan Reggiano, divided
Kosher salt and freshly ground black pepper, to taste
Garlic-infused olive oil, to finish (optional)

Directions
Bring a large pot of salted water to a boil. Add spaghetti and cook until al dente, about 8 minutes. Drain and return to pot. 

In a large skillet or Dutch oven, heat 1 tbsp olive oil over medium heat. Add pancetta and cook until lightly browned. Transfer pancetta to paper towels and set aside. 

To the same skillet, heat 1 tbsp olive oil over medium heat. Add garlic, chilies, and fennel seeds, scraping up any browned pancetta bits, and stirring until fragrant, about 1 minute. Add fennel wedges and sauté until soft, 6 minutes. Add cherry tomatoes, and cook gently for 4 more minutes. Then stir in broth, shrimp, 2 tbsp parsley, and juice of 1 lemon, and bring to a boil. Reduce heat to low, cover, and simmer for 15 minutes. Uncover the skillet and cook, stirring occasionally, for about 5 minutes, or until liquid has reduced by half. 

Add reserved spaghetti to the fennel mixture and stir in octopus and its oil, cooking until the liquid is absorbed, about 5 minutes. Gently stir in the pancetta, half the parmesan, and season to taste with salt and pepper. Serve on plates or in shallow bowls garnished with remaining parsley, parmesan, lemon zest, and drizzled lemon juice and garlic-infused olive oil. 

Nutrition Analysis Per Serving: 550 Calories, 17g fat (5g saturated), 60g carbs, 7g fiber, 55g protein, 45% vitamin A, 50% vitamin C, 40% calcium, 40% iron